Master the future of cloud data management with AccentFuture’s Snowflake training courses, your gateway to expertise in the Snowflake platform. Our Snowflake online course offers a perfect blend of in-depth knowledge and hands-on experience, designed to enhance your skills in data storage, processing, and analytics. With our flexible Snowflake online training, you can learn at your pace and transform your career with one of the most in-demand cloud technologies today.
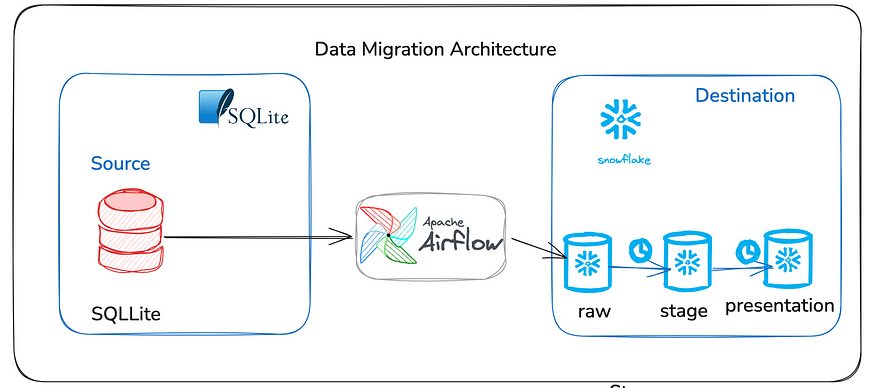
In today’s data-driven world, migrating data between systems efficiently is crucial for businesses. One common scenario is migrating data from SQLite, a lightweight database, to Snowflake, a powerful cloud-based data platform. To automate and streamline this process, we can use Apache Airflow, a popular orchestration tool that allows scheduling and managing complex data pipelines.
In this article, we’ll walk through a complete step-by-step guide to migrate data from SQLite to Snowflake using Airflow. By the end of this guide, you’ll have a fully automated pipeline that can be scheduled to run on demand or at regular intervals.

GITHUB Code:- sqllite_to_snowflake_migration.py
Prerequisites
Before we begin, ensure the following:
- You have Airflow installed and running.
- You have access to an SQLite database that you wish to migrate.
- You have access to a Snowflake account with the appropriate permissions to load data.
- You are familiar with basic Python, SQL, and database operations.
Step 1: Install Required Libraries
Before building the pipeline, we need to install the necessary Python libraries that enable Airflow to interact with SQLite and Snowflake. Run the following command:
Step 2: Configure Airflow Connections
After setting up Airflow, the next step is to configure the necessary connections for SQLite and Snowflake. This can be done through the Airflow web interface:
Configure SQLite Connection:
- In Airflow, go to the Admin menu and click on Connections.
- Click on + Add a new connection.
- Set the following details:
- Conn ID:
sqlite_conn - Conn Type:
SQLite - Database: Path to your SQLite
.dbfile (e.g.,/path/to/mydb.db)
Configure Snowflake Connection:
- Go to the Admin menu and click on Connections.
- Click on + Add a new connection.
- Set the following details:
- Conn ID:
snowflake_conn - Conn Type:
Snowflake - Account, Username, Password, Database, Warehouse, and Schema according to your Snowflake configuration.
This configuration allows Airflow to connect to both the SQLite database and Snowflake.
Step 3: Define the Airflow DAG
Now, let’s define the DAG (Directed Acyclic Graph) in Airflow that will automate the process of migrating data from SQLite to Snowflake.
The following Python script does the following:
- Extracts data from SQLite.
- Loads the data into Snowflake.
Here is the full code for the DAG:from airflow import DAG
from airflow.providers.sqlite.hooks.sqlite import SqliteHook
from airflow.providers.snowflake.hooks.snowflake import SnowflakeHook
from airflow.operators.python import PythonOperator
from airflow.utils.dates import days_ago
import pandas as pd

from airflow import DAG
from datetime import timedelta,datetime
from airflow.utils.dates import days_ago
from airflow.operators.python_operator import PythonOperator
from sqlalchemy import create_engine,MetaData,Integer,String,Column,Table
import pandas as pd
from airflow.providers.snowflake.operators.snowflake import SnowflakeOperator
default_args = {
    'owner':'venkat',
    'start_date' : days_ago(0),
    'email':['test123@gmail.com'],
    'retries':1,
    'retry_delay': timedelta(minutes=5),
}
def create_insert_data_into_sqlite():
    engine = create_engine('sqlite:////opt/airflow/sqliteserver.db')
    metadata = MetaData()
    users_table = Table(
        'users',metadata,
        Column('id',Integer,primary_key=True,autoincrement=True),
        Column('name',String),
        Column('age',String),
    )
    metadata.create_all(engine)
    with engine.connect() as connection:
        connection.execute(users_table.insert().values(name='Venkata', age=35))
        connection.execute(users_table.insert().values(name='Raj', age=40))
def extract_data_from_sqlite(**kwargs):
    engine = create_engine('sqlite:////opt/airflow/sqliteserver.db')
    query = "select * from users"
    df = pd.read_sql(query,engine)
    records = df.to_dict(orient='records')
    kwargs['ti'].xcom_push(key='sqlite_data',value=records)
def prepare_snowflake_sql(**kwargs):
    records = kwargs['ti'].xcom_pull(task_ids='extract_task',key='sqlite_data')
    sql_statements = ""
    for record in records:
        sql_statements += f"INSERT INTO users (id,name,age) VALUES({record['id']}, '{record['name']}',{record['age']});n"
    kwargs['ti'].xcom_push(key='snowflake_sql',value=sql_statements)
with DAG(
    'sqllite_to_snowflake_migration',
    default_args = default_args,
    description='this task is for create sqllite and load data',
    schedule_interval='@once',
) as dag:
    insert_task = PythonOperator(
        task_id='insert_task',
        python_callable = create_insert_data_into_sqlite,
    )
    extract_task = PythonOperator(
        task_id='extract_task',
        default_args = default_args,
        python_callable = extract_data_from_sqlite,
        provide_context=True,
    )
    prepare_sql_task = PythonOperator(
        task_id='prepare_sql_task',
        default_args = default_args,
        python_callable = prepare_snowflake_sql,
        provide_context=True,
    )
    create_table_task = SnowflakeOperator(
        task_id='create_table_task',
        snowflake_conn_id = 'snowflake_conn',
        sql="""
        CREATE OR REPLACE TABLE users(
        id INTEGER,
        name STRING,
        age INTEGER
        );
        """,
    )
    load_task = SnowflakeOperator(
        task_id='load_task',
        snowflake_conn_id = 'snowflake_conn',
        sql="{{ ti.xcom_pull(task_ids='prepare_sql_task',key='snowflake_sql')}}",
    )
    insert_task >> extract_task >> prepare_sql_task >> create_table_task >> load_taskCopy code
Step 4: Trigger the DAG in Airflow
Once you’ve defined the DAG, you can trigger it manually in Airflow:
- Go to the Airflow UI (usually at
http://localhost:8080). - Find your DAG (
sqlite_to_snowflake_migration) and trigger it by clicking the Play button.

Step 5: Monitor and Validate Data Migration
Once the DAG runs, you can monitor the task status and logs in the Airflow UI. Check the logs to ensure the data extraction and loading tasks were successful.
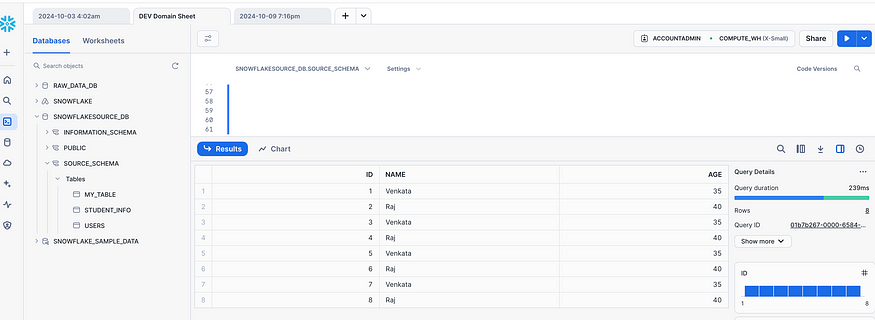
After the process completes, verify the data in Snowflake by querying the target table:
SELECT COUNT(*) FROM users;

Ensure the data matches what you have in the SQLite database.
Step 6: Automating the Pipeline
You can schedule this pipeline to run at regular intervals by modifying the schedule_interval in the DAG definition. For example:
- Daily: Use
'@daily'as theschedule_interval. - Hourly: Use
'@hourly'. - Custom schedule: Use cron expressions like
'0 0 * * *'for midnight every day.
Once this is set, Airflow will automatically run the pipeline according to the defined schedule.
Conclusion
In this guide, we covered how to automate data migration from SQLite to Snowflake using Apache Airflow. By using Airflow’s scheduling and monitoring capabilities, you can easily build and manage automated data pipelines that can be run on-demand or at regular intervals. The setup allows you to scale the pipeline and integrate additional data sources or transformation steps as needed.
Airflow, combined with Snowflake’s powerful data warehousing, offers a robust solution for organizations that need to move data between databases efficiently and reliably.
This hands-on workshop was an excellent opportunity for data engineers and professionals to hone their skills and learn how to create efficient, scalable real-time pipelines. Stay tuned for future workshops to continue mastering the world of data engineering!
Should you encounter any issues, our team is readily available to provide guidance and support with a prompt response. Please do not hesitate to reach out to us at any time contact@accentfuture.com
Wishing you continued success in your coding endeavors 
Unlock new career opportunities with AccentFuture’s Learn Snowflake program, designed to help you master the cutting-edge Snowflake cloud platform. Gain hands-on expertise in data management and analytics through our expert-led training.
For more details, visit www.accentfuture.com, call or WhatsApp us at +91-96400 01789, or email contact@accentfuture.com and start your journey today!


